WebHostingBuzz Blog Hosting, hosting, more hosting and a little of everything else

All posts in cPanel

Is cPanel / WebHost Manager the best control panel for reseller hosting?

If you’ve read my previous articles, such as Should I choose reseller hosting to host multiple websites?, you’ll know that I’m a big fan of reseller hosting. Shared hosting is fine for a single web site, but once you have a few sites or domains, reseller hosting is light years ahead of shared hosting.

Reseller hosting has many advantages, but for me the biggest one is convenience. When I was running two or three separate web sites, I wanted something that would be more efficient to manage, to save me time and trouble. I thought that there had to be a better way. That’s when I discovered reseller hosting.

Reseller hosting saves me time and helps me manage my sites more effectively. Much of the advantage is due to cPanel, the hosting control panel that I use. There are many reseller control panels available, and your choice will have a large impact on your experience. I tried other control panels, some good and some not. Don’t choose a reseller host without evaluating the control panel that they will provide you.

When evaluating control panels, one of your considerations should be the size of its user base. While popularity doesn’t always equal quality, it’s helpful for a control panel.

Popularity is important when you do a web search for another explanation of some feature, or for assistance with something you’re trying to accomplish. Having installed some good but unpopular software tools on my PC, that last point is significant. It was frustrating trying to find on-line discussions about uses similar to mine. A high number of users also means that any issues with a new release are likely to be reported quickly so they can be remedied.

cPanel is the world’s most widely used web hosting control panel, with about 70% market share in the U.S. That results in a wide selection of web hosts, and a wealth of tutorials and forums on the Internet for peer-to-peer assistance.

cPanel has been in continuous development for many years, resulting in a product that is mature, stable, and offers a wealth of useful features. It’s simple enough for beginners to use, with included tutorials and help files, but has powerful features for the advanced users.

cPanel includes WebHost Manager (WHM), the control panel used by reseller accounts to create and administer the client accounts. WebHost Manager lets you operate as if you’re a large web hosting operation, creating accounts, creating hosting packages with the features you choose to assign, setting quotas for disk space, bandwidth transfer, number of e-mail accounts, and more.

I like the division of tasks between cPanel and WebHost Manager. Essentially, if I need to perform functions as an individual site or domain, I use cPanel, as one of my shared hosting clients would do. Even in this, cPanel’s reseller hosting simplifies my life, as I can access all my client sites’ cPanel accounts via one single reseller login.

When operating more as a reseller, say creating new accounts, altering quotas or setting domain redirection actions, I login to WebHost Manager. WebHost Manager shows me all my client accounts at a glance, listing the hosting package assigned to each, its quotas and the chosen cPanel theme. Between cPanel and WebHost Manager, everything I need to do is easily accessed and managed.

The visual appearance of cPanel and WebHost Manager can be altered using themes. You may easily choose from a variety of themes, affecting layout, colours and icons. Third-party themes are also available, and you may create your own theme or edit existing themes. As a reseller, you set which theme each hosting package or client account uses. Afterwards, clients can select a different theme for their own client accounts.

If you want the most popular control panel that’s powerful and easy to use, I recommend cPanel.

cPanel interface

Share

Should I choose reseller hosting to host multiple websites?

You start with one web site, running in a shared hosting account. Then you add another web site, in another shared hosting account. Soon you add another site, perhaps for a friend or a club you help run. At some point you wonder if there’s a simpler way to handle several sites than all those shared hosting account accounts. Well, there is: reseller hosting.

A reseller hosting account is rather like a large, master hosting account. It has all the features of shared hosting, plus a whole lot of additional features. It also allows you to create multiple shared hosting accounts, under the control of the master or reseller account.

Originally, reseller hosting was created as a way to enable small-scale web hosting businesses. Even a one-person business can, with reseller hosting, create and sell shared hosting. However, I believe that the real value of reseller hosting has nothing to do with reselling.

A reseller hosting account typically provides you with a control panel at a higher level than shared hosting, allowing you to control all the shared accounts below you. I find this enormously convenient for managing my multiple domains and web sites. Think of them not as plans for people reselling web hosting, but as plans for anyone who wants an easier and more powerful way to manage multiple domains, web sites and hosting accounts.

At WebHostingBuzz, shared hosting accounts use cPanel control panel. Reseller accounts also get WebHost Manager (WHM) to manage administer those shared accounts. The reseller account can, with a single login, make changes to all client accounts and access all the client accounts’ cPanels. This is a real time saver when managing multiple domains and sites, as I do.

Reseller hosting also simplifies the management of your hosting. Instead of managing separate bills and payments for several web hosting accounts, you pay a single monthly fee for your reseller account, no matter how many web sites you host.

Reseller accounts have a wealth of features and functions not available in shared hosting. One of the coolest features is the ability to have personal nameservers. Instead of using nameservers provided by your host, with their name in the domain name, you create nameservers tied to your reseller domain or main domain. If your main reseller domain is “BobbingBoys.com”, you may create ns1.BobbingBoys.com and ns2.BobbingBoys.com. You can configure all your “client” accounts to use ns1. and ns2.BobbingBoys.com as their nameservers.

Personal nameservers, when enabled by your web host, are a way of exercising greater control over your domain names. The nameservers, which provide lookup services to direct Internet traffic to your domains, become part of one of your domains (usually your main domain). While they aren’t different servers, as you’ll still be using the physical nameservers provided by your host, they’ll now be identified with your domain name.

More importantly, personal nameservers mean that all your many domain names, and resold client domain names, will all be tied to your main domain. That eases management tasks.

If you’ve ever had to move several domains to a new host or a new server with your existing host, you’ll know how much work it is. You must change the nameserver list for each domain individually at the domain registrar. It can be worse if you have paying hosting clients who maintain control over their own domain names. Before the move, you must inform your clients that you’re moving, asking them to change their nameservers (by editing the list at their domain registrars) by a certain date. Naturally some of them do not, so after the move you’re dealing with client complaints due to failing e-mail and site inaccessibility.

With personal nameservers, you need only register the new IP addresses for your personal nameservers, and all client domains will resolve to the new location automatically based on your nameservers. When I have moved servers all I’ve had to do is to update my nameserver IPs for my reseller domain, the main domain that “contains” the personal nameservers, at my registrar. It takes less than a minute.

WHM nameservers

Another advantage of reseller hosting is the ability to employ domain redirection on multiple domains. You may use both Park and Redirect. Multiple domains may be pointed to target web sites, according to your needs and what you want your visitors to see.

There really are too many reseller advantages to list in one article. Here are some of my favourite advantages of a reseller account over regular shared hosting:

  • Manage all your domains and cPanel accounts from a single login.
  • Pay one monthly (or annual) bill, instead of several.
  • Greater control. You may set disk space usage and bandwidth limits for each account or for groups of accounts.
  • Create your own self-signed SSL certificates.
  • Create hosting accounts to resell, as each of your clients will have his/her own cPanel account and login. This can be a great option to provide hosting accounts to friends and family, even if you don’t charge for them.
  • Personal nameservers.
  • Skeleton directory, to automatically provide consistent setup of files in newly created accounts.
  • Domain redirection.

If you currently manage a few domains, or plan to, do yourself a favour and look at a reseller account. Once you enjoy the benefits of a reseller account, you’ll never go back to regular shared hosting.

WebHost Manager main interface

WebHost Manager main interface

Share

Should I choose cPanel for my VPS?

My last post, The benefits of a Linux VPS, described why you may want a Linux VPS (Virtual Private Server) for your hosting needs. Once you settle on a VPS, you’ll need to make a decision on which control panel you prefer.

You’ll probably want some sort of control panel. You can, if you wish, run a web server and web sites without a control panel. All administration can be performed using command line, scripts and connection tools such as SSH. But, even those of us technically minded enough to do that usually prefer the efficiency and simplicity of a good control panel. For many functions, a control panel is faster and easier than more technical methods. If you’re reselling hosting accounts to clients, most of them will want a control panel.

When evaluating control panels, one of your considerations should be the size of its user base. While popularity doesn’t always equal quality — McDonald’s sells millions of burgers, but it’s not fine food — it’s helpful for a control panel.

Popularity comes in handy when you do a web search for another explanation of some feature, or for assistance with something you’re trying to accomplish. Having installed some good but unpopular software tools on my PC, that last point is significant. It was frustrating trying to find on-line discussions about uses similar to mine. A high number of users also means that any issues with a new release are likely to be reported quickly so they can be remedied.

cPanel is the world’s most widely used web hosting control panel, with about 70% market share in the U.S. That results in a wide selection of web hosts, and a wealth of tutorials and forums on the Internet for peer-to-peer assistance.

While cPanel is used to administer a single web site, for VPS accounts it comes with WHM (Web Host Manager) to manage a server and reseller environment. WHM allows you to configure your server and manage multiple client hosting accounts with ease.

cPanel/WHM provides graphical, web-based screens to handle both simple and complex tasks. WHM enables you to easily create client hosting accounts, create hosting packages with allocations of bandwidth and disk space, and set the features available to the shared hosting accounts. WHM on a VPS allows you not only to create shared hosting accounts, as with a reseller account, but also to create and sell reseller accounts.

WHM allows you to configure the VPS as you would a dedicated server. Setting a server hostname, assigning IP addresses and nameservers, and configuring the mail server are all easily handled through the WHM interface.

Your choice of control panel for your VPS won’t mean much if the version seen by your hosting clients is difficult to use. You don’t want to needlessly increase your support costs due to an awkward end-user interface. That’s an area in which cPanel excels, as legions of novice web site owners will attest. cPanel is simple enough for beginners to use, and includes tutorials and help files.

cPanel

cPanel is in ongoing development, receiving regular updates. Updates provide bug fixes, security enhancements and new features. As a VPS client, you won’t need to worry about those updates, which will be applied by your host.

Web mail and statistics are two cPanel features that will be useful to both you and your hosting clients. cPanel includes three web mail applications already installed and active, so no work is required of you. You and your clients can choose any of the web mail apps to access mail from the server through any web browser.

Statistics include the popular AWstats, which tracks details of all web site visits. AWstats can show visits to the site by hour and day, number of unique visitors, breakdown of visitors by country, and even the search terms they used to find your site through search engines such as Google. AWstats are displayed in various easy-to-read ways, including running totals and graphical charts.

AWstats

One of my favourite features is the ability to login to cPanel user my reseller or VPS password, and easily switch to the cPanel for any of my client sites with a single click. The cPanel reseller password, the same one used to login to WHM, serves as a sort of master password. Once logged in, you may jump from the current control panel to that of any of your client sites. That single login to manage multiple accounts makes life simpler for us resellers, or in fact anyone managing many domains.

cPanel helps you manage your VPS, saving you time and providing a popular, user-friendly tool for you hosting clients.

Share

The benefits of a Linux VPS

Your business has outgrown its shared web hosting or reseller hosting plan, but you’re not quite ready for the leap to a dedicated server. What to do? Linux VPS (Virtual Private Server) hosting is the answer.

Linux VPS hosting has become very popular, as it’s an ideal middle ground between shared hosting and the complexity of a dedicated server. Virtual Private Server (VPS) hosting is a level above reseller hosting. As the name implies, it mimics the control available with a dedicated server, but at a lower price.

The web host configures a server into several VPS accounts. Each VPS account has a share of the server’s resources allocated to it as a minimum performance standard, plus the use of additional processing resources when available. A VPS account gives you virtual root access and the ability to configure your virtual server as though you controlled an entire physical server. You have all the power of a LAMP (Linux, Apache, MySQL, PHP) server.

Typically a VPS account comes with a control panel for management. At WebHostingBuzz, cPanel’s WHM is one of the available choices. The VPS control panel allows you not only to create shared hosting accounts, as with a reseller account, but also to create and sell reseller accounts.

Some of the benefits of Linux VPS hosting include:

  • Guaranteed server resources allocated to your VPS account. Unlike shared and reseller hosting, your account wouldn’t normally be affected by other users on the server.
  • Higher performance, as the resources allocated to your VPS account exceed those available to shared and reseller hosting.
  • Root access, just as on a dedicated server, providing greater control, more features, and ways to directly access files that are often faster than using the cPanel GUI.
  • Ability to configure server-wide defaults, such as behaviour for directory indexing for all accounts under the VPS.
  • Support from the web host who creates the VPS. WebHostingBuzz, for example, offers comprehensive support with its VPS. This helps you concentrate on your own priorities, while allowing you to learn at an assisted level before moving to a dedicated server.
  • Personal nameservers, which in my opinion are one of the great advantages of VPS or reseller hosting. Instead of using nameservers provided by your host, with their name in the domain name, you create nameservers tied to your reseller domain or main domain. If your main reseller domain is “AcePro.com”, you may create ns1.AcePro.com and ns2.AcePro.com. You can configure all your “client” accounts to use ns1. and ns2.AcePro.com as their nameservers. This is better for branding your business, and makes the task of moving to a new server or host far simpler.
  • Skeleton directory, or skel, to configure default files and folder structure to be used for all new accounts under the VPS. This directory is used as a template, or skeleton, for new cPanel accounts. Anything placed in the skeleton directory is automatically copied to the home directory of any new cPanel accounts you create. As with personal nameservers, this is a great way to extend your web hosting brand. You could, for example, set all new hosting accounts to display a welcome message, your logo and contact information, and links to web hosting help files for the new hosting client.
  • Options for domain management. For example, you are able to use both Park and Redirect, depending upon your needs.

I began running a hobby web site using free space provided by my ISP. I soon found that too limiting, and moved to shared hosting. As soon as I had a few domains and sites, reseller hosting was the answer to my need for easier and more flexible management of multiple accounts.

I now use a VPS, and like the ability to change server config and have central management over all accounts. I could go back to reseller hosting if I had to, but I could never return to shared hosting.

For those of us with many domains and sites who require greater configurability, a VPS account gives us everything we need. It provides the level of control of a dedicated server, but at an affordable price. For those whose web hosting needs are still evolving toward one day managing a server themselves, a VPS account is a great transition on the way to a dedicated server.

WHM main screen

Share

Quick jump to cPanel accounts after reseller login

My last article explained that a cPanel reseller password provides access to any client account without need for the client account’s own password. That makes life simpler for us resellers. There’s another benefit of that feature: single login to manage multiple accounts.

Once logged in using a reseller password, the top of each cPanel page displays a drop-down list. On that list is every account under that reseller. You can jump from one account to another simply by selecting the desired account. This is a time saver and another reason why, if you manage more than a couple of domains, it’s well worth it to upgrade to reseller hosting.

Share

Single reseller login manages all cPanel accounts

As I’ve said before, if you have more than a couple of domains reseller hosting is much better than standard shared hosting. Here’s another reason: you can reduce your logins.

The cPanel reseller password, the same one used to login to WHM, serves as a sort of master password. When logging in to any of your cPanel accounts you may gain access using the reseller password. This is a useful feature, as it saves you having to remember all the client account passwords.

If you have a VPS (Virtual Private Server) or dedicated server, you may also use the root password for the same purpose, though I prefer to use the reseller password and save use of root for when it’s truly needed.

Share

How to create personal nameservers
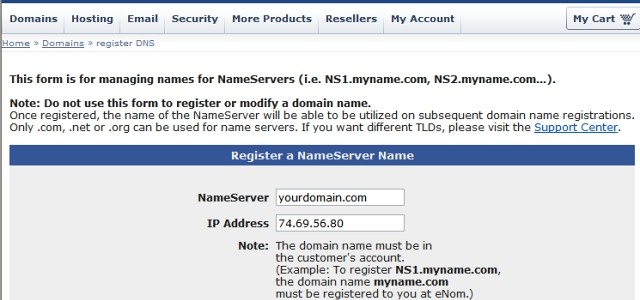
Are you ready to create your own personal nameservers? I recently covered the benefits of personal nameservers and wrote that I wouldn’t want to manage my multiple domains, and those of my clients, without them. Today I’ll summarize what you need to do to create and use personal nameservers.

First, you must have a domain name registered to you (or at least under your control), on which to create personal nameservers. For example, if you have the domain name bigdog.com, you could create personal nameservers ns1.bigdog.com and ns2.bigdog.com.

You must have a hosting plan that includes the ability to use personal nameservers, such as a reseller or VPS plan. If you don’t currently have this, ask your host about upgrading. Your host will assign you two IP addresses for use as personal nameservers: typically one for ns1., and one for ns2.

Your host should also configure your control panel, such as cPanel, to automatically use the new personal nameserver as the nameservers for any new domains you add to your account. They may also be able to change your existing accounts to use the new nameservers, so it’s worth asking. If you don’t have many domains, it’s not hard to change them yourself. Don’t make this change until after the new nameservers are properly registered and active though.

Create personal nameservers

  1. Check the DNS Zone of your main domain (the one on which you will create personal nameservers) for existence of “A” records for the personal nameservers. This will be in the form of ns1 14400 IN A 66.45.34.91, where that IP address is the one assigned by the host for that nameserver. While this record is not absolutely necessary, it will reduce DNS errors and speed lookups. If on cPanel, you can view and edit those records using the WHM command Edit DNS Zone.
  2. At your domain registrar, register the nameservers. Most domain registrars have an on-line tool. (example from my registrar, eNom, is below).
  3. After allowing a few days for propagation, edit the DNS for your hosted domains to specify that they will use the personal nameservers. This should also include your main domain which is the parent of the personal nameservers. That’s right: a domain can use its own nameservers, so rabbit.com can use ns1. and ns2.rabbit.com for its DNS.
  4. Go to the domain registrar for each of the client domains to edit the nameserver list to specify the new personal nameservers. If someone else, such as a paying client, has control of the domain then ask that person to do this.

Registering personal nameservers at your domain registrar

As an example, here’s how to do it at eNom:

  1. Login to your account.
  2. Domains menu, Advanced Tools, click Register a Name Server.
  3. Enter “ns1.domain.com”, where “domain.com” is your domain name.
  4. Enter the IP address that your host assigned you for use as ns1.
  5. Click Submit.
  6. Repeat those steps to register ns2.
Registering personal nameservers at eNom

Registering personal nameservers at eNom

Note that eNom and many other registrars allow automated nameserver registration only onto .com, .net and .org domains. A different process may apply for other top-level domains.

Additional information
WebHostingBuzz has two relevant wiki entries:

When you resell hosting to paying clients, personal nameservers allow your domain setup to look more professional and complete. Even if you don’t resell, personal nameservers make it easier to manage and move multiple domains.

Share

Personal nameservers streamline multiple domains

For those of you with your own domain names, a few questions:

  • Do you host multiple domain names?
  • Do you resell hosting to clients?
  • Have you ever moved to a new server or web host, and had to spend time at your domain registrar changing nameservers for every domain individually?

If you answered “yes” to any of those, then you should consider using personal nameservers.

As I stated in an earlier post, personal nameservers are one of the great advantages of a reseller, VPS or dedicated hosting plan over standard shared hosting. Instead of using nameservers provided by your host, with their name in the domain name, you create nameservers tied to your reseller domain or main domain. If your main reseller domain is “AcePro.com”, you may create ns1.AcePro.com and ns2.AcePro.com. You can configure all your “client” accounts to use ns1. and ns2.AcePro.com as their nameservers.

If you’ve ever had to move several domains to a new host or a new server with your existing host, you’ll know how much work it is. You must change the nameserver list for each domain individually at the domain registrar. It can be worse if you have paying hosting clients who maintain control over their own domain names. Before the move, you must inform your clients that you’re moving, asking them to change their nameservers (by editing the list at their domain registrars) by a certain date. Naturally some of them do not, so after the move you’re dealing with client complaints due to failing e-mail and site inaccessibility.

With personal nameservers, you need only register the new IP addresses for your personal nameservers, and all client domains will resolve to the new location automatically based on your nameservers. When I have moved servers (which I have done a few times) all I’ve had to do is to update my nameserver IPs for my reseller domain, the main domain that “contains” the personal nameservers, at my registrar. It takes less than a minute.

Personal nameservers, when enabled by your web host, are a way of exercising greater control over your domain names. The nameservers, which provide lookup services to direct Internet traffic to your domains, become part of one of your domains (usually your main domain). While they aren’t different servers, as you’ll still be using the physical nameservers provided by your host, they’ll now be identified with your domain name.

More importantly, personal nameservers mean that all your many domain names, and resold client domain names, will all be tied to your main domain. That eases management tasks.

In addition to the efficiency benefits, personal nameservers are a way to add more professionalism by further branding your on-line presence. This is feature that many hosting resellers like to use to disguise the fact that they are reselling. They like the nameservers to be part of their own domain. Many large companies also do this, both for the control and the branding. For example, a domain lookup on microsoft.com shows that it uses the following nameservers:

  • ns1.msft.net
  • ns2.msft.net
  • ns3.msft.net
  • ns4.msft.net
  • ns5.msft.net

As msft.net is registered to Microsoft, those are personal nameservers.

Terminology
Nameservers may be spelled as “nameservers” or as “name servers”. Personal nameservers are often referred to as “private” nameservers, though I dislike that term since they are certainly not private. Nameservers are, by definition, accessible and queryable, so they are not private. A truly private nameserver would be of little use. I believe that “personal nameservers” is more descriptively accurate. The idea is that the nameservers are personalized to you.

An ideal term would be “branded” nameservers, but I’ve yet to see anyone call them that. Whatever you call them, I think they are a great aid to anyone managing many domain names. In an upcoming article I’ll explain how to create personal nameservers.

Share

Sub-domains and redirects simplify web access

Sub-domains are useful. When you have your own domain name and a hosting account, you can create sub-domains.

Domain extensions such as .com and .ca are called top-level domains (TLDs). A second-level domain is a domain that is directly below a top-level domain, such as webhostingbuzz.com. That’s what we usually think of as a domain name which we can register. The next level down would be a third-level domain, also called a sub-domain, such as sales.domain.com or www.domain.com.. In fact, there can be multiple levels of sub-domain.

cPanel makes it easy to create sub-domains, as it’s done through a web-based interface and all the hard work is done automatically. By default, a cPanel sub-domain of dog.domain.com would have its URL resolve to domain.com/dog, but you can change that using a redirect. Combining a sub-domain with a redirect makes it possible to have short, elegant looking URLs that resolve to deeply nested paths.

For example, to more easily access each of the cPanel webmail clients via SSL, I made three sub-domains each redirected to an https URL:

  • horde.domain.com redirects to https://domain.com:2096/horde/
  • round.domain.com redirects to https://domain.com:2096/3rdparty/roundcube/
  • squirrel.domain.com redirects to https://domain.com:2096/3rdparty/squirrelmail/

To create a redirected sub-domain in cPanel:

  1. Click Subdomains.
  2. Click Create a Subdomain.
  3. Enter the desired sub-domain name.
  4. Click Create.
  5. When you see the message indicating that the sub-domain was created, click Go Back to return to the Subdomains screen.
  6. Under the Modify a Subdomain section, click Manage Redirection.
  7. Enter the path to which you want the sub-domain to resolve, and click Save.
  8. Enter the new sub-domain in your browser, e.g. .sub.domain.com, to see it work.

When working on early frameworks for a client web site, they might be accessed at a nested folder such as domain.com/clients/workshop/empire-surfboards/master.php. I create a sub-domain redirected to that URL. It’s far easier for me to remember empire.domain.com, and easier for my client.

When travelling, I often upload digital maps, itineraries and other useful documents to my web server. These serve as accessible backups for me, in case I lose the paper files I’m carrying, and family can also access these. Again, to simplify access I create a redirected sub-domain such as france.domain.com.

Once you realize how convenient redirected sub-domains can be, and how easy they are to create, I’m sure you’ll think of plenty of uses.

Share

Secure webmail access via SSL

In my article Secure your web hosting account logins I recommended that you use an SSL (https) connection to login to your account. Logically, my same reasoning for better security also applies to using webmail.

For secure access to cPanel webmail, use: https://domain.com:2096
That will take you to the same webmail client selection screen I described in an earlier post, but with this URL your access will be secure under SSL.

If you wish to directly access a particular cPanel webmail client via SSL, use these URLS:

  • Horde: https://domain.com:2096/horde/
  • RoundCube: https://domain.com:2096/3rdparty/roundcube/
  • SquirrelMail: https://domain.com:2096/3rdparty/squirrelmail/

In my next article, I’ll explain how you can more easily access those URLs using sub-domains.

Share