How to Publish a Site
Index page
There are several methods to build a site. You can be a php/html/css expert, know java script, etc., but if you are, you most likely won’t be reading this. If you are new to web site development there are easier techniques to master for a start, such as content management systems like Joomla and WordPress or WYSIWYG editors (Adobe Dreamweaver, Adobe GoLive).
When you use CMS, the web site structure is built automatically. You don’t do any coding and in most cases you just add content to ready-made pages. The default design is changed by means of templates, free or paid.
If you build a site yourself, you will need to create each page separately and link them to one another. There must be a start page, which loads when users visit your site’s home page and which is linked to other pages for users to be able to navigate your site.
The default name of such a start page is ‘index.html’. The extension may vary (index.htm, index.php, etc.), depending on the technology that was used to develop a web site.
If the start page name is not index.html the website will not be displayed properly. All you will see in the browser is the list of files located in the directory where your domain is rooted (document root).
Of course, you can rename the start page you have to ‘index’. Although if your web site pages are linked to each other with absolute links (they define a specific location of a page) it will be necessary to rename the start page in these links. Otherwise internal URLs will be broken and your site will be impossible to navigate.
The better solution in such a case is to redefine the name of a start page in the web server configuration. This can be done by adding an Apache directive to the .htaccess file in the DocumentRoot:
DirectoryIndex start_page.html |
Where start_page.html is the name of the index file you want to use. Again, .html is given as an example, you should use the extension that corresponds to the type of your file. If you do this, the server will no longer look for “index.html” as the DirectoryIndex command completely replaces the default names.
The DirectoryIndex command is explained in more detail in the Apache Web server documentation http://httpd.apache.org/docs/2.2/mod/mod_dir.html#directoryindex
Publishing methods
Once done, the website can be published on the server in different ways. We will show the most common and widely used ones.
cPanel File Manager
The simplest way to upload a website to the server is to use File Manager in cPanel.
To upload files via File Manager you need to:
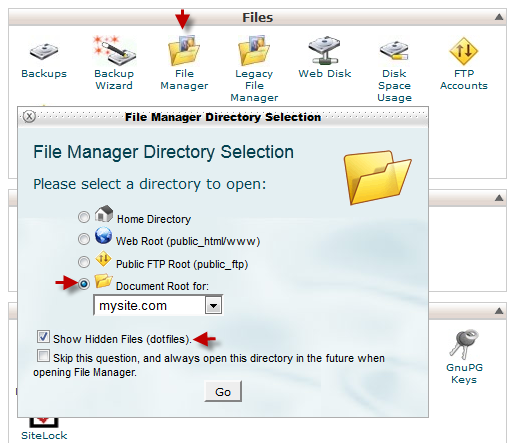
cPanel > Files > File Manager
Choose Document root and a site in question from the drop down menu and press Go. Check Web root to go to public_html directly.
If you want to view hidden system files such as .htaccess, etc., leave the box Show Hidden Files checked.
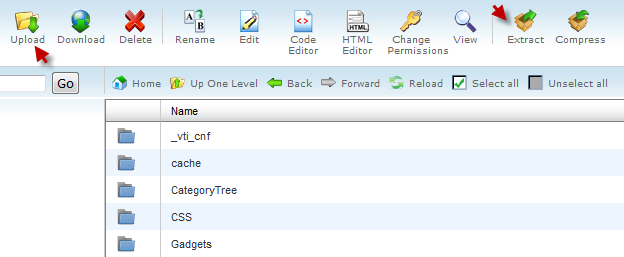
Click the Upload button.
You can also extract or compress archives, which come handy if uploading/downloading multiple files.
Upload/download of compressed files is much faster and reduces the number of connections established between you and a server.
The firewall we use on our servers (CSF) has ability to limit number of all connections that were opened to the server from an IP address. If the server is accessed via FTP for downloading/uploading a lot of small files, it will probably trigger the firewall, as each file requires separate data transfer connection. When data transmission is finished, connection goes to TIME_WAIT state, which is because of TCP protocol implementation that guarantees delivery of all data transmitted. I.e. the state means that both sides are to confirm the transmission is finished and no more data is to be sent. The connection is still present after each file transfer via FTP, then more connections are established when the next file is to be transferred. When files are small, they are transferred faster than the connection completely closes, and the number of TIME_WAIT connections grow. This can trigger the firewall, especially in case other connections are established as well (e.g. via HTTP).
FTP client
Another way to upload files to your hosting account is by using an FTP client.
With the help of an FTP client you can get instant access to your web space, and upload files very quickly. You can set a default editor for particular types of files, change permissions, rename and delete files and folders.
This is more convenient than File Manager in cPanel with the only drawback: to extract files, you will still need to log into cPanel as FTP clients do not support this feature.
Dreamweaver
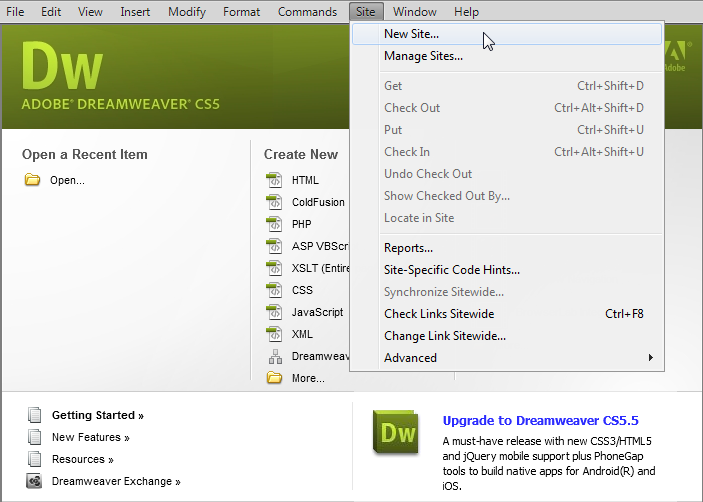
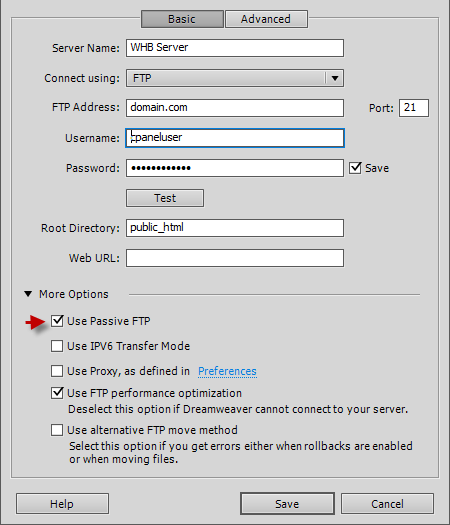
Dreamweaver (CS5) is a program which allows you to not only create a website but upload it from your local PC to a destination server. To publish the website which you have created, via Dreamweaver, you need to set up the remote server first.
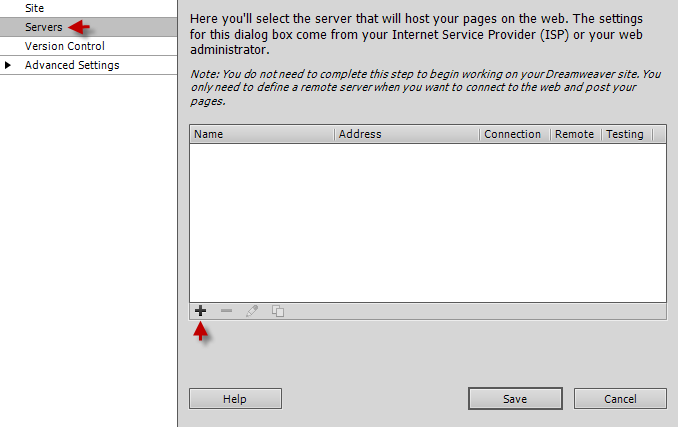
- Go to Server tab and click + (plus sign) to add remote server and configure FTP connection.
- In the Server Name field, you can use any name you want which is associated with your hosting account on the server.
- In the FTP Address field, indicate any domain name that is pointed to the server your account is hosted on or the server IP address.
- In the Username and Password text boxes, put either your cPanel username and password or credentials of a particular FTP account.
- Put public_html in the Root Directory if you publish a site for your main domain or public_html/addondomain.com – for addon domain.
- Click More Options and check Use Passive FTP box.
- Press Test to check if your settings are correct and whether Dreamweaver can establish connection to the server.
- Click Save.
More information about setting up a website in Dreamweaver can be found at Dreamweaver support page
Was this article helpful?

