How To Easily Change Web Hosting Providers
Posted on 28 Aug 2014 by Adam
It can be easy to feel locked-in to a specific hosting provider, but in reality it’s not a complex process and just takes a little time.
Additionally, if you move hosting providers within 1-3 months of signing up with them, you might even be able to get a refund of what you’ve paid so far, since many hosting providers offer 30, 60 and 90 day money-back guarantees.
Initial Considerations
Before even thinking about buying a web hosting plan, you should take some time to consider what exactly you need from your new web hosting plan.
You should ask yourself questions such as:
- How many websites will I be hosting?
- How much disk space do the websites take up on the server?
- How many visitors do my websites get? (take a look at your website statistics to see bandwidth figures)
For more guidance and tips here, have a read of my other post on the topic.
Transferring your website from your old hosting provider to your new hosting provider
If you follow these steps in the correct order, you shouldn’t suffer any downtime since both hosting accounts will have the website files.
1. Create a backup
The first, and most important step, is to do a backup of all of your website’s files and any MySQL databases, then download this backup to your computer.
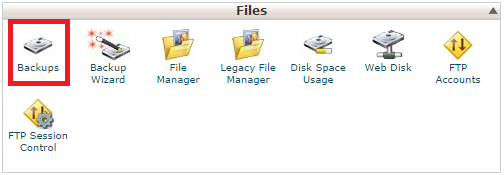
If you’re using cPanel, click Backups under the Files box.

Once you’ve clicked Backups, you should see another area that looks something similar to the following. If you can see that a backup already exists which is recent (within 24hrs or so), you can just go ahead and hit Download.
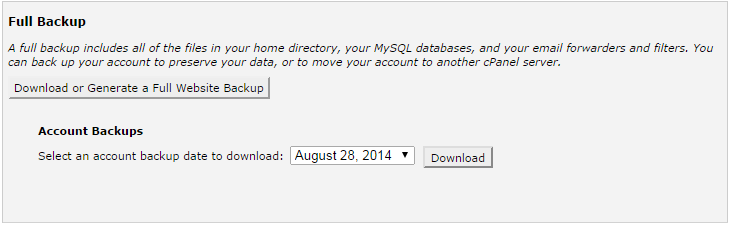
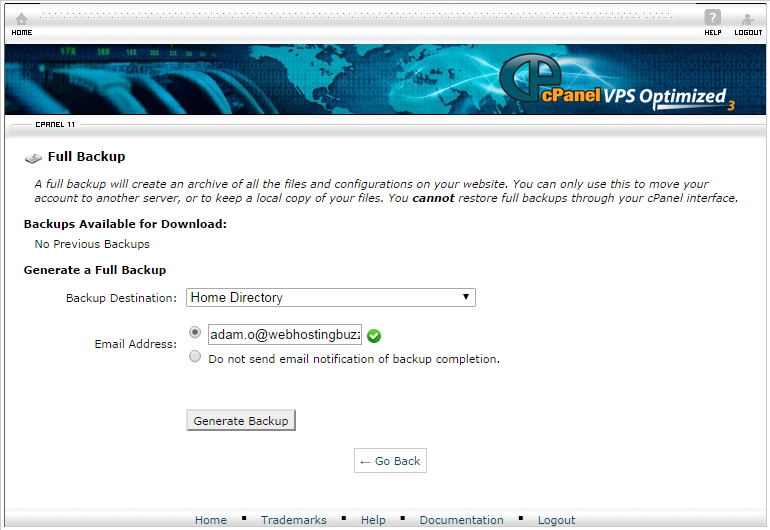
Alternatively, if a recent backup doesn’t already exist, you can go ahead and create one by clicking ‘Download or Generate a Full Website Backup’. If you enter your email address, you’ll get a notification once the backup is available for download. You can then download it as shown in the previous screenshot.
2. Transfer your website files & databases
Now that you have a backup of your files in case anything goes wrong, you should now transfer your website’s files across to the new server. You can import databases using phpMyAdmin.
3. Create new email accounts
At this point, you can set up email accounts on the new hosting account. If your new hosting provider uses cPanel, you can do this within the ‘Email Accounts’ area.
4. Change your nameserver (DNS)
To ‘point’ your domain name over to your new web server, you’ll now need to log in to the admin panel of your domain registrar (aka. the site you bought your domain name from), such as Namecheap, GoDaddy, etc. Once you’re logged in, find the domain name in question and look for a mention of nameservers. Nameservers usually start with ns1., ns2. etc., so you should be able to spot these. Once you’ve found where these can be changed, you should copy and paste the new nameservers you were given by your new hosting provider (these can usually be found in your sign up email, or ask if you’re not sure), then click Save.
Depending on a few different variables such as the registrar, domain ending etc, the time taken for your website to ‘resolve’ to your new hosting account could take from just a few minutes to 48 hours or more.
5. Make sure everything works
Test and make sure your website is working as expected with your new hosting provider. To make sure that your website is live on the new server and not still on the old one, you can use a browser plugin to or alternatively use a site such as whoishostingthis.com to check that the nameservers have changed correctly.
6. Transfer your emails
Transfer your emails across by simply having each email address setup twice in your email client (Outlook, Thunderbird etc.), then simply dragging and dropping emails over. So click on the Inbox of the account on your old server, click the email at the top, then scroll right to the bottom and whilst holding down the Shift key, click the email right at the bottom. You’ll now have selected all of the emails in the Inbox folder, so you can simply drag these over to the Inbox of the newly setup email account.
7. Delete files from old hosting account & cancel old hosting plan
Finally, you can go ahead and delete any remaining files on your old hosting account, and request for your hosting plan to be cancelled.
If you choose to move to WebHostingBuzz, there’s an even easier option:
To make the whole process as simple and stress-free as possible, WebHostingBuzz offer a free transfer service for your websites’ files and databases.
Reseller Hosting isn’t just for Resellers
21 Oct 2013 by Adam
Why Fast Server Speed is Important for SEO Rankings
16 Sep 2014 by Adam
Popular Posts
-
We’ve launched a brand new website design!

Posted on 16 Feb 2015 by Adam
Hello! As you may have spotted, we recently launched a brand new website design on WebHostingBuzz.com. Having focused ou...read more
Categories
Twitter Feed
Find Us on Facebook
© WebHostingBuzz USA LLC 2002 - 2024
WebHostingBuzz is a Registered Trademark.
All Rights Reserved.
WebHostingBuzz USA LLC, 850 Southbridge Street, Auburn, MA 01501, USA
1 (800) 252-1887


